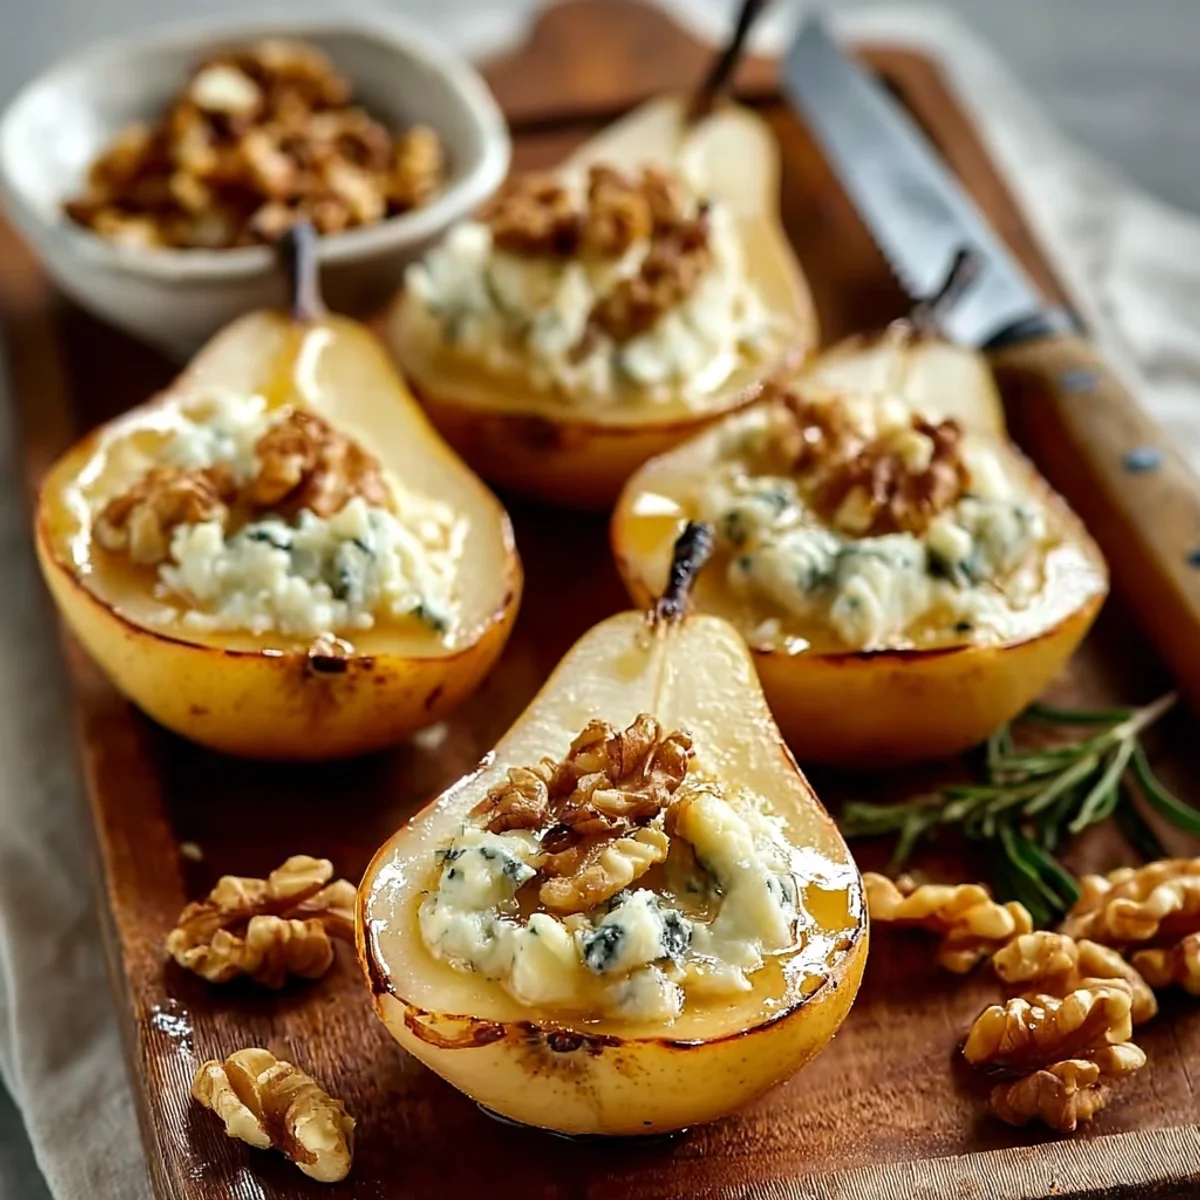


I remember the first time I stumbled upon the idea of Blue Cheese Stuffed Pears. It was a chilly autumn evening, and I was trying to impress a few friends with something a little more 'grown-up' than my usual cheese board. Honestly, I just had some pears looking a bit sad on the counter and a wedge of blue cheese I’d forgotten about. The smell of roasting pears with a hint of honey wafting through my kitchen? Pure magic, really. This recipe became an instant favorite because it’s got that fancy feel without being a huge fuss. It's truly a sweet and savory dream, and it just makes any gathering feel a bit more special, you know?
To be real, my first attempt at these Blue Cheese Stuffed Pears was a bit of a comedic disaster. I got a little too enthusiastic with the honey and ended up with caramelized pears stuck to the baking sheet. And the walnuts? They nearly burnt while I was distracted by a phone call. Oops! But even then, the taste was so good, I knew I had to perfect it. It taught me that sometimes the best recipes come from happy accidents and a few charred edges.
Ingredients
- Sweet Pears: I love Bosc or Anjou for their firm texture that holds up to roasting, and their natural sweetness. Don't use overripe ones, they'll turn to mush, and nobody wants pear mush.
- Crumbly Blue Cheese: Gorgonzola or Roquefort are my go-tos. That tangy, salty kick is essential! I once used a very mild blue, and it just didn't pop. Trust me, go for the good stuff here.
- Toasted Walnuts: These add that crucial crunch. Honestly, don't skip toasting them, it brings out their nutty flavor. I often just toast a big batch and keep them for salads, too.
- Golden Honey (or Maple Syrup): A drizzle of sweetness balances the blue cheese beautifully. I’ve used maple syrup when I was out of honey, and it worked wonderfully, giving a deeper, richer note.
- Olive Oil: Just a touch to help the pears get beautifully tender and prevent sticking. Any good quality extra virgin olive oil works for me.
- fresh Thyme Sprigs: The aromatic, earthy notes of thyme really elevate this dish. I once tried dried thyme, and it just wasn't the same. fresh is best for that vibrant scent.
Instructions
- Prep the Pears:
- Okay, first things first, preheat your oven to 375°F (190°C). Then, grab your pears. I usually cut them in half lengthwise and use a small spoon or a melon baller to scoop out the core and a bit of the flesh, creating a little hollow for our cheesy goodness. Don't scoop too much, or your pears will be too thin and might fall apart! I once got a bit aggressive and nearly went through the bottom. Rookie mistake, learn from me! What you want are sturdy, pear-shaped cups.
- Season and Roast Lightly:
- Next, arrange those pear halves, cut-side up, on a baking sheet lined with parchment paper. A little drizzle of olive oil over each, maybe a tiny pinch of salt and pepper. This step is about getting them slightly tender before they meet their cheesy fate. Pop them into the preheated oven for about 10-15 minutes. You're looking for them to just start softening, not turn into mush. I always set a timer, because honestly, I get distracted easily and those pears can go from perfect to overcooked in a flash!
- Mix the Blue Cheese Filling:
- While the pears are having their solo roast, it’s time for the star of the show: the filling! In a small bowl, crumble your blue cheese. Add the toasted walnuts, chopped roughly, and a good drizzle of honey or maple syrup. Give it a gentle mix. You want it combined, but still a bit crumbly, not a paste. This mixture smells so good, I often have to restrain myself from just eating it with a spoon. The tang of the cheese, the sweetness, the crunch it's a symphony!
- Stuff and Drizzle:
- Carefully pull those semi-roasted pears from the oven. Now for the fun part! Spoon the blue cheese and walnut mixture generously into the hollow of each pear half. Don't be shy, load 'em up! Once they're stuffed, give them another light drizzle of honey over the top. This extra bit of sweetness will caramelize beautifully and make them look extra inviting. This is where I sometimes make a mess, getting cheese everywhere, but hey, that's just part of the charm, right?
- Final Bake:
- Slide those gorgeous stuffed pears back into the oven for another 10-15 minutes, or until the blue cheese is melty and bubbly and the pears are tender. You'll see the edges of the cheese get slightly browned, and the honey will be bubbling. The whole kitchen will smell incredible a warm, sweet, savory aroma that just makes you want to cozy up. Keep an eye on them, ovens can be quirky, and you don’t want that cheese to burn.
- Garnish and Serve:
- Once they're golden and gooey, carefully remove the Blue Cheese Stuffed Pears from the oven. I like to let them cool for just a few minutes so they're easier to handle and the cheese isn't lava-hot. Garnish with a few fresh thyme sprigs it adds such a lovely pop of color and freshness. Sometimes, I add a tiny swirl of balsamic glaze, too. Serve them warm. Watching friends' faces light up when they take that first bite? That's the best part, honestly!
Honestly, these Blue Cheese Stuffed Pears have seen me through many impromptu get-togethers and even a few solo 'treat yourself' nights. There was one time, I was rushing, and the blue cheese crumbles went flying across the counter when I opened the container. It was a mess, but a delicious mess once I got it all together. Every time I make them, it feels like a little victory, a simple elegant dish that brings a smile.
Blue Cheese Stuffed Pears: Storage Tips
If you happen to have any Blue Cheese Stuffed Pears leftover (which, let's be real, is a rare occurrence in my house!), you can store them. I usually pop them into an airtight container and keep them in the fridge for up to 2-3 days. Reheating is best in the oven or a toaster oven at a low temperature, around 300°F (150°C), until warmed through. Microwaving them? Well, I tried that once, and the pears got a bit soggy, and the cheese lost its nice texture, so I wouldn't recommend it if you want that fresh-baked feel. They're definitely best enjoyed warm, right out of the oven, but cold isn't bad either if you're just grabbing a quick snack.

Blue Cheese Stuffed Pears: Ingredient Swaps
I’ve experimented quite a bit with these Blue Cheese Stuffed Pears, depending on what I have on hand. For the pears, apples (like Honeycrisp or Gala) can work in a pinch, though they give a different texture a bit firmer. I tried it once, and it was good, but the pear's tenderness is just something special. If blue cheese isn't your jam, a creamy goat cheese or even a sharp aged cheddar could be interesting, though you'll lose that distinct tang. For the walnuts, pecans or even pistachios would be lovely, adding a different kind of nutty crunch. And instead of honey, a good quality balsamic glaze drizzled before serving is a fantastic alternative for a less sweet, more acidic note. Don't be afraid to play around!
Blue Cheese Stuffed Pears: Serving Ideas
These Blue Cheese Stuffed Pears are incredibly versatile. They shine as a sophisticated appetizer, perhaps alongside a glass of crisp white wine or even a slightly sweet dessert wine, which really complements the flavors. For a light lunch, I sometimes serve them with a simple green salad dressed with a vinaigrette the freshness cuts through the richness beautifully. They also make a fantastic addition to a holiday spread, looking so elegant on a platter. Honestly, for me, a cozy night in often involves a plate of these, maybe a bit of crusty bread, and a good book. They’re just so comforting and satisfying, a proper little treat.
Cultural Backstory
The combination of fruit and cheese, especially pears and blue cheese, isn't new, it's a classic pairing found in various European cuisines, particularly French and italian. It speaks to a long-standing appreciation for balancing sweet and savory, creamy and sharp flavors. For me, discovering this particular dish felt like uncovering a little secret from those old-world traditions, a way to bring a touch of that simple elegance into my own kitchen. It's a reminder that sometimes the best recipes are those that combine a few quality ingredients in a way that just makes sense, a culinary embrace across cultures and time.
So there you have it, my take on these wonderful Blue Cheese Stuffed Pears. They’re a little bit fancy, a little bit rustic, and a whole lot of delicious. Making them always feels like a small culinary adventure, and seeing them turn out perfectly golden and bubbly is just so satisfying. I hope you give them a try and maybe even have your own little kitchen 'oops' moment that leads to a perfect bite. Let me know how they turn out for you!

Blue Cheese Stuffed Pears FAQs
- → What kind of pears work best for Blue Cheese Stuffed Pears?
I always reach for Bosc or Anjou pears. They're firm enough to hold their shape while roasting, and their natural sweetness is just right. Avoid anything too soft, or you'll end up with mush, which I found out the hard way once!
- → Can I make these Blue Cheese Stuffed Pears ahead of time?
You totally can! I often prep the pears and the filling separately, then assemble and bake them right before serving. It saves a lot of last-minute fuss, and the flavors still come through beautifully, honestly.
- → My Blue Cheese Stuffed Pears came out too soft. What went wrong?
Ah, that's usually from over-roasting in the first step! Pears can go from firm to soft really quickly. Keep a close eye on them, you just want them slightly tender, not fully cooked through, before stuffing.
- → How long do Blue Cheese Stuffed Pears last in the fridge?
I've kept them in an airtight container for up to 2-3 days. They're best warm, but they're still a pretty good cold snack. Just remember not to microwave them if you want to avoid soggy pears!
- → Can I use a different type of cheese for Blue Cheese Stuffed Pears?
Of course! I've tried goat cheese, and it's lovely for a milder tang. Feta could also work for a saltier profile. Experimenting is part of the fun, even if some attempts are a little 'meh'!